DATA STORAGE & BACKUPS: strategies for Filmmakers & Photographers

“Data doesn’t really exist unless you have at least two copies of it.”

– Jack Schofield

I’ve both had a lot of people ask me about this, as well as seen a lot of hard to action information out there – so I wanted to create a guide that’s both easy to follow, but also gives enough context to empower people to make their own decisions to suit their own storage and backup needs.

This post exists as a supplement to the video below, and will include the backup tree graphics from the video as well as an itemised list for the recommended setup.

​​DATA STORAGE & BACKUPS: strategies for Filmmakers & Photographers

As per the video, my basic recommended setup which I feel would suit most photographers, small content creators, and other one-man-band type businesses is as follow (updated due to parts availability):

  1. 1x 2tb Samsung T5 usb-c SSD drive [working scratch drive]
  2. 1x OWC ThunderBay 4 RAID 5 4-Bay External Storage Enclosure
  3. 2x Seagate Exos 16tb drive
  4. FreeFileSync
  5. BackBlaze
Backup Tree for recommended setup
Backup Tree for alternative recommended setup

Specifics on exactly how to implement this are included in the video. This setup will put you well ahead of the curve, with one local backup, and one offsite backup – meaning your data exists in 3 places at once.

If you have any questions, consider joining the discussion in the comments section for this video over on YouTube.

For more info about Backblaze, take a look here: hendrikusdevaan.com/backblaze/

How I Make Ciabatta Bread

Click here for printable recipe PDF

It seems that the global pandemic has just about everyone baking bread. Some out of boredom, some out of necessity. I started out by baking some Ciabatta. Our local Countdown supermarket has a pretty dismal bakery section, and we’re currently in a nation wide lockdown, so I figured I couldn’t do any worse. Turned out delicious – and I soon graduated to Sourdough.

I wanted to share my simple Ciabatta recipe, so that others might also find a gateway into baking fresh bread.

The video shows the methodology, and the recipe is more of a cheat sheet. I find the bulk of recipes are long and cumbersome to read, so I tried to make mine as “skim-readable” as possible. They definitely were designed as companion pieces.

I’ll cut myself off there, at the risk of being one of those annoying people that write their life story before every recipe so that you have to scroll for days to find the important stuff (I put the download PDF link at the top of the page).

Go bake some bread!

Print ready recipe PDF


Links for those who want to do a deeper dive:

YOUTUBE: John Kirkwood | Ciabatta Bread made easy at home

YOUTUBE: Sourdough Bread | Basics with Babish (feat. Joshua Weissman)  –  here is a simplified PDF recipe I created for this video.


Panic Attack

This is probably my most personal video to date. At first I wasn’t sure if I wanted to share this publicly, but I decided that it’s an important topic we all need to talk more about.

If you’re struggling with your mental health, know that you’re not alone.

It’s important you find someone to talk to, be it a friend, loved one, or health care professional.

In New Zealand:
Free call or text 1737 any time for support from a trained counsellor
Or
Lifeline – 0800 543 354 (0800 LIFELINE) or free text 4357 (HELP)

International help: https://checkpointorg.com/global/

Making bold music choices for videos (Bull Sale 2019)

Context:

I’ve always found this such a quintessential staple of rural life growing up in Ratapiko. The Blackwell family always put on a great day, with great hospitality.

I had badly put my back out the day before, and could barely drive my car to the event, but I wanted to film it, so I gritted my teeth and got on with it.

Shortly after filming I ended up hospitalized for some abdominal pain. I seem to be on the mend now and managed to finish the final video (above).

For more info about the farm: facebook.com/mangaotea/

Anyway, about the music:

The music track is on a CC license from a composer called Aaron Kenny. I was looking for a track that would fit the video, and I had a bit of a country vibe in mind.

When working on no budget stuff like this, I generally try to find a track before I start editing, but only after I’ve made my initial selects. That way I know the mood of my video, but I can time my edit to the track I end up with.

This is limiting in the sense that you have a specific duration that’s not easy to change, but when you’re choosing Creative Commons music for video – you have to make some compromises. It’s simply not practical to compose something from scratch for these videos.

So with a country look in mind I started searching through the youtube audio library. Most of the country style stuff had a real hillbilly bluegrass vibe to it, which doesn’t really suit the NZ countryside, and the rest was more rock music.

I found that most tracks didn’t have much in the way of rise and fall, they were pretty flat in structure. Which is not very cinematic, because it quickly can fall into the trap of “broll with loud music, talking head with music ducking, broll with loud music, etc repeat”. I want to treat these sorts of videos more as structured micro movies, rather than vlogs.

It’s then that I came across this absolute gem by Aaron Kenny that sounded just like the sound track for Blazing Saddles or such. A good western vibe, without screaming “I have children with my cousin”. Best yet – the quality of the track was pro level, and allowed for a cinematically structured video, because the track was made for the screen. A rare find in the Creative Commons.

At first it might have seemed like an odd choice, because it’s not particularly trendy, and it seemed over the top campy, but the further I got into the edit the more sense it started to make.

By the time the video was done – I couldn’t imagine any other track in it’s place. And that’s what filmmaking is – finding a beautiful marriage between picture and sound, and delivering a seamless flow of information that captures a moment and feeling in time.

So go forth and make bold unconventional music choices – they just might surprise you!


THROWBACK THURSDAY: “BlinkLink” – Commercial 2015

This week’s TT is a cautionary tale of overreaching. I had been offered to do a commercial on a budget under $500 usd while living in Budapest. Hungry for work I accepted, and subsequently spent a month shooting and post producing a commercial I never had the budget to pull off. It fell well short of my vision, but all things considered – I think it turned out pretty good. The client got an absolute bargain on that one!

I don’t mind working on spec, or on tight budgets when needed, but the main thing I learned from this experience was in future to build a concept around my limitations and work creatively from there (so basically, something like DollarShaveClub instead of a VFX heavy mess!).

THROWBACK THURSDAY: “DISAPPEAR” – short film

Released on my 25th birthday, this was my biggest project I’d ever tackled. I’d done very little animation before I started on this, and spent the subsequent two and a half years putting together this four minute stop motion animated film.

Although I’d never do it again, this film holds a strong place in my heart. It literally took me around the world on a festival circuit, and let me meet a lot of my filmmaking heroes as equals, which was truly humbling.

I also made a behind the scenes documentary for it, sponsored by YSOP INTERNATIONAL:

THROWBACK THURSDAY: Explainer Video for “WhoAPI” (plus a bonus video)

I’ve done a lot explainer videos over the years, although I stopped doing them after the margins got impossibly tight. It was no longer profitable to make them from scratch, and I didn’t want to spend my weeks kit-bashing asset packs and presets.

The WhoAPI video was one of the last ones I did. I collaborated with the business owners wife, who was an amazing artist and created a custom comic book for the company.

I composed the music track, did the voiceover, and turned the comic book into an animated book. It ended up being one of my favorites.

Another company I had a long working experience with was Intraboom. Below is one of many video I did for them:

I don’t think I’ll ever get back to doing animation work, because the gig economy has priced individuals in first world countries out of the market, and I don’t want to run an animation studio. However, I feel like I gained a lot of good experiences over the dozens I made at the time.

MUSIC VIDEO “Fin Rah Zel”: how to light on no budget, and my thoughts on the a6400.

Having been out of the industry for some time, I needed a small project to re-calibrate myself, and get a better connection with my new camera.

This video was done on essentially zero budget. Shot completely handheld, and lit with some basic household tungsten bulbs.

In terms of light modifiers, I had a $2 china ball, and a piece of tattered old blackwrap. And a desk lamp with kitchen baking paper diffusion.

FINRAHZELstill01
(click for full 4k resolution)

Looks pretty damn good if you ask me! The biggest limitation was not being able to cut the light, as I would have liked to have been able to drop the wall exposure another stop. But with less than $30 worth of lighting gear, all in, I’m pretty happy.

I didn’t even have lighting stands, so I used a mic stand and an old music stand I modified. Where there’s a will…

Finally, the a6400, and the OSS sony lenses. This changes everything. When I first got the camera I was a bit concerned about rolling shutter etc, and I don’t think I would use this camera without OSS (“optical steady shot”, Sony’s version of in-lens Image Stabilization).

(Sony 18-105f4 OSS & 35mmf1.8 OSS)

But the OSS works beautifully. It makes this sub 1kg camera look like it weighed 10kg with a traditional lens on it. I think this is a big turning point for me, because I no longer have to frankenrig my cameras out just to add weight. My back will thank me for it.

(FrankenRig from 2011)

Now for the star of the show, autofocus. Dirty, dirty autofocus. That thing we were told never ever to touch if we wanted to be “proper filmmakers”. Well, you know what, 70% of this video was shot with autofocus touch-to-focus. And I think I had about a 95% success rate with it. The tracking is dead on, no hunting. The focus shift can be set to fast, normal, or slow. I had it set to slow and got the nice cinematic style focus changes. I wish there was a speed between normal and slow, but honestly, that would just be icing on an already amazing cake.

Finally, would you believe that this video was shot at both 400 and 3200 iso? I can’t see the difference between the two. It wasn’t that long ago that iso 800 was a grainy mess. We really do have it good, it’s so liberating as a filmmaker. Less money, less gear, less lighting heat, less back pain.

(my entire kit for this video)

I remember having a film camera fully rigged in lightweight “handheld” configuration on my shoulder. I think it was around 8kg or so. Also, this exact same music video would have cost at least $5000 on film, as opposed to $0. I think this is what people mean when they say “filmmaking has been democratized”.

THROWBACK THURSDAY: “Budapest Pride Parade” – 2015

I remember the first year I lived in Budapest I woke up one morning and looked out my window. I lived on the busiest intersection in the city, but on this particular morning the streets were deserted. Thirty minutes later police turned up by the dozen wearing full riot gear. I had no idea what the fuck was going on. Eventually I heard music coming from far away. Not long after the Gay Pride Parade was coming through a deserted metropolis. It was such a surreal moment that reminded me that I most certainly was in Eastern Europe.

The following year I wanted to join the parade. I shot this little short video whilst marching for Hungarian LGBT rights.

THROWBACK THURSDAY: “Rainbow” short film 2011

This was short film I made together with my family members as a means to introduce them to the process of film making. It was brainstormed, shot and edited in 24 hours.

I think doing 24 hour short films is an excellent exercise. It’s like a scripted equivalent of vlogging almost. Very liberating.

Shot on a 550d / T2i with Nikon and Tokina lenses.

THROWBACK THURSDAY: My first introductions to Stop Motion Animation

Back in 2009 I worked on a music video project “Turtle Pizza Cadillacs” by my friend Aleks Sakowski. After that I was really itching to do some stopmo of my own. It started with these little tests that I shot on a bookshelf in my 4 square meter room I was renting while I was studying (I managed to fit a bed, a wardrobe, a desk, and two bookshelves in there. It made Japanese apartments look big!

This is what eventually led on to me doing DISAPPEAR.

Here is the music video by Aleks:

THROWBACK THURSDAY: “V1Z1” Teaser Trailer (2010)

Going back 9 years to when I got my first video DSLR. I shot this silly fake trailer with a bunch of friends. Lots of After Effects, and lots of fun!

Shot on the Canon 550D / t2i, which in my opinion is the camera that democratized filmmaking. It was the first camera that anyone could afford, and it shot much more cinematic images than and of the handycams that were available prior. No more letus lens rigs, no more HDV tapes. Just simple filmmaking.

The only thing was that you couldn’t shoot sync sound, because the preamps sucked, so we all had a Zoom H4N and a pluraleyes plugin. Every take you had to remember to manual start the audio recording at the same time as your video recording. For one man run and gun, that was a PITA. But we didn’t care, we finally had a camera with a s35mm sensor that we could afford!

Progress. More than one minute into the film.

It has been a while since I have last posted. Lots has been done since then.

Late 2012 the newspaper for my region came out and did a story on the film, which was an interesting experience. Still, if there is one thing I have learnt from it, it’s: never trust the media. I had specifically asked them not to film certain aspects etc, but that was completely ignored. Moral of the story – have selective NDAs on hand.

For those who have not yet seen the article, it is available here: http://www.stuff.co.nz/taranaki-daily-news/entertainment/8062288/Theres-no-stopping-this-dedicated-young-film-maker

.

.

I have also, and finally, put together a showreel: (removed)

.

.

Furthermore,  I am at approximately 1 minute and 20 seconds into “Disappear” (I say approximately to leave room for tweaking/editing). So that means I’m about 30% of the way through animating.

Shot04

So, ticking along. Amongst juggling various other projects, and a life etc, I’m still aiming for completion before the end of June.

I’ve decided to build a motion control rig. It turns out that moving the camera by hand is proving to be far too distracting from the animation process. I will be building it in two phases;

Phase 1:  Dolly (1500mm rail), Pan, Tilt, Focus + 8 channel Arduino powered control box.

Phase 2: Boom and Swing (jib/crane)

Building it in two stages will allow me to finish the film sooner (and save some money initially). I have to say a special thanks to Doug Kropla for ideas and electrical advice, and also Leo Hutson, who will be helping me on the electrical and programming fronts.

I’m sure there is a lot I have missed, but that will have to wait for another time. Back to work!!!

Harrie

First shot is in the can! (and a sneak peak)

I finished my first shot for “Disappear” on Thursday night at around 11pm. After being in pre-production on and off for around 12 months, this is a major milestone. I can finally start to see my vision take on a life of its own.

——————————————————————————————————-

Stay tuned for some frames pulled right out of the first shot at the end of this post…

——————————————————————————————————-

I actually did a little bit of previs before I started animating to help me with the timing and spacing.

And after a very short practice run I kind just dove right in.

I have to say that character animation in stop motion is by far the single most difficult thing I have ever done in my life thus yet. It probably didn’t help that the first shot was a massive 40 seconds long! At 12fps I shot 488 frames over two weeks, including a camera move on the geared head.

It’s a pretty amazing feeling having this first shot done. I’m gearing up for the next shot now.

You’ll have to excuse the quality of the photos, these were taken on my cellphone because the 2nd slr was in the office.

The following is a still of the last frame in the sequence;

————————————————————————–

As promised, here are some still frames from the first shot…

————————————————————————–

Now, onto that next shot….

Till next time,

Harrie

The apartment set is close to finished!

So I have finally finished up on “The Great Gatsby” and have been back in the studio for a few weeks now.

The set is nearing completion and I should think it is not unrealistic to start shooting in June as scheduled, unless the feature film I am booked on decides they want me for an extended period of time :D.

First up, I have completed the lighting. I have used 12v halogen downlights, custom wired up and attached to the top side of the ceiling with height/ spread adjustable options. These serve as my “practicals” and will be dim-able, as well as having an option between 20w and 50w bulbs for desired exposure.

So these are mounted above a hole in the ceiling of the set, as below;

And then have some hand made chinese light shades;

Which when attached provide a very nice soft light and create the illusion of having a standard ceiling mounted bulb;

I have also applied an aging process to all of the walls, floors and ceiling.

The kitchen is now also complete. I have since attached a tap, however photos will have to wait until next post.

Also, all of the doors and windows are now complete. All with brass fittings that I have hand made. The window latches are filed out of brass rod, and the door fittings and key holes etc are drilled and filed out of brass bar.

I have made a start on sculpting some of the smaller props also. Along with these are the kitchen tap and the armatures for the dove.

The rabbits are now too complete. I firstly airbrushed them with an appropriate base coat and under-fur shading and then hand painted the wet parts such as the nose and eyes.

After that I used static grass to flock them.

So yeah, everything is coming along. I can really see it starting to come together now.

Looking forward to shooting!

Until next time 🙂

Harrie.

My Theatre Debut!

So I had temporarily fallen of the face of the earth and lost contact with the world, so I will explain where I have been;

As some of you already know, I have been in a theatre production of “The Great Gatsby”, in one of the leading roles, Nick Carraway. The show went incredibly well and was very positively received.

This was my first show, having previously acted only in front of the camera and never in front of an audience. It was a very big role, so I certainly had to learn to swim as I was drowning, I was on stage for aprox 95 pages (/minutes).  It  was a very different experience and has taught me a lot.

Here are some photos of the play;

Thanks to everyone involved. I had a great time.


Cheers,

Harrie.

1000 1:6 scale bricks and a wardrobe

Another month has flown by. I’ve been really busy with my theater role in the production of “The Great Gatsby”. The show starts in just over two weeks, so will only be getting busier from here on in.

In the studio;

I’ve finished the neighboring brick wall.

I did a base coat of ceiling paint and then black spray paint. After that, I used various shades of Resene test pots to paint the wall, and drybrushed it to give it a sort of “bricky” look.  I found that the test pots are actually a really cheap way to get ultra specific colors for next to no money.

After that I proceeded to fill in the gaps with cement, wiping of the excess with a damp cloth. After it was all dry I gave it a rub with a dry cloth and it actually gave it a really awesome layed brick texture, with some of the cement having seaped into the grooves of the bricks themselves.

It holds up pretty well to closeups…

In fact, even at an individual level, I find them to be fairly photorealistic.

I liked them so much actually that I ended up doing one of the interior walls of the apartment set in brick too (the one that would be the exterior wall). So, around 1000 1:6 scale bricks later…

In addition to that, 1:6 scale carpentry keeps on rolling on. I’ve found myself having to cut a lot of balsa strips, and this was becoming very time consuming to do by hand, so, I made an adjustable strip cutting jig. I recommend it to anyone who needs to cut a lot of balsa, it saves SO much time.

You just adjust it to the desired width and then run it along the balsa. Super easy and way more accurate than I was doing by hand.

I’ve finished my last piece of free standing furniture; the wardrobe.

For those who have read the screenplay, you understand the significance of this piece, and for those who haven’t – the wardrobe is the place where the man has kept his dreams and aspirations locked away.

Here’s the frame;

And a mid-build shot;

And here it is finished (with the apartment bricks in the background);

I handmade a lock and fittings out of brass and used some tiny 12mm hinges.

One of the back panels is also hinged, so it can open for me too shoot through the wardrobe for a shot or two.

I’ve really been enjoying the tiny furniture making.

So now I am working on the apartment door, the windows, the plinths etc, the kitchen, the rabbit, the dove. Well, I guess I’m working on lots of stuff.

Thanks for reading, until next time.

Harrie.

Furniture, hands and a tiny key.

Wow how time flies huh? Another month already. With this in mind I’ll quote Bruce Lee;

“If you love life, don’t waste time, for time is what life is made up of.”

Been a good month, lots of progress. I have all of the furniture finished apart from the wardrobe, which is a hero prop (I’m starting on that tomorrow).

I’m finding the balsa to be nice to work with. The furniture ends up extremely light, which from a production point of view is a little unnerving, but it feels fairly strong. It’s nice to carve too, for handles etc.

I’ve found a fairly good workflow for the balsa now, and a lot of the joints are carved out and inserted just like full size furniture. Wanted to be sure it would photograph well.

Next up I made a tiny key. This is for when he unlocks his wardrobe in which he keeps his hopes and dreams locked away. I had no idea how I was going to make it, so I ended up melting some pewter on the stove and casting a blank in a mold I cut from MDF. After that I filed, drilled, and sanded it into a key. Doesn’t get much more “from scratch” than that.

I’ve also made a whole bunch of 1/6 scale paper work, reports and general paper clutter to fill his dining table to which he brings his crappy job home too. These were just printed at 1200 dpi on the laserjet then manually cut up and assembled. The printing is pretty fine so I think it should photograph nicely.

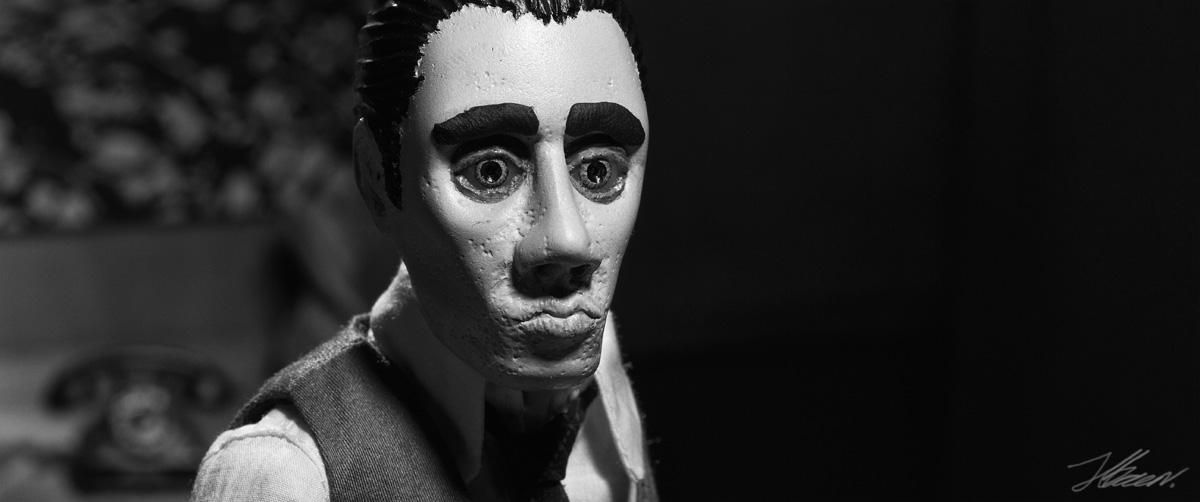
As you can see, I’ve dressed a little briefcase too. The base on which this photo was taken is actually what will be the characters bed too.

The Liquid latex build up hands (over the annealed aluminium wire, brass knuckles and heatshrink armatures) are now done too.

They don’t have fingernails, which is something I’ll learn to live with. But other than that they have a fairly organic feel to them. I did a fair few sets, this photo is of my spares alone, for the inevitable case of finger armatures fatiguing over time. One pair of hands has rare earth magnets embedded in them too.

So now I’m also working on what will be the view from his apartment window; a brick wall, with a curtained window.

I cut a whole heap of bricks out of wood;

And started gluing them the the wall;

And now I need to fill in the gaps with some sort of putty and then score it to imitate the cement, and then paint and weather it. I’ll do the window frame when I do the rest of the windows and doors for the apartment.

I actually found the wood to have a very cool texture, almost like that of bricks in fact.

On top of all of that I’ve bought a new computer to be able to handle the shooting and post production needs for this film. I’m feeling a little light in the pocket at this very moment, but it had to be done.

For those geeks who are interested; Intel 3.4gzh corei7 clocked to 4.5ghz, 16gb of 1600mhz ram, Raedon 6870HD gfx card, and about 5.5TB of hdds, with the scratch disks running in RAID0 to keep up with the high bitrate footage. Still need to get a video monitor (prob HDTV), capture card (Matrox or Blackmagic), protools & mixer, and some back up HDD’s as finances permit.


Until next time!